LaTeX Flow
LaTeX Flow: Editing LaTeX in NeoVim
True goodness is like water. Water is good for everything. It doesn't compete.
It goes right to the low loathsome places, and so finds the way.
- --Lao Tsu Tao Te Ching No. 8
The PYPL index lists Visual Studio as the most popular download search with a 30.6% share, and IntelliJ ranks sixth with a 6.2% share, yet Vim seems relatively obscure, ranking 12th with a 0.7% share. So why do 23.6% of Rust programmers use Vim as their code editor, as well as 24.2% of developers on the latest Stack Overflow survey?
Having personally admired the flow of developers like Jon Gjenset using Vim on the Crust of Rust series, I started exploring and have become quite a fan. After making the switch as my primary code editor, I became curious if I could not also use Vim for producing PDF files using LaTeX. This is not an article about why Vim is awesome, or why you should use Vim, but it does explain how to use Vim to edit LaTeX documents. Setting up Vim as an editing environment can be an involved process, and I found myself pulling nuggets from several sites and cobbling together a Frankenstein configuration. This post consolidates the info from these various sources into a single reference for setting up a LaTeX workflow.
Since the content is longer than average for a blog post, I have included links to the section headings:
Table of Contents:
Editor of Choice - NeoVim
Previously I used RStudio for R and IntelliJ for everything code-related. These programs are feature rich, but bloated and heavy, consuming significant amounts of RAM. LaTeX editors that I tried, including Scribus, are light-weight but not feature-rich enough. For my thesis, I used Lyx, but for journal articles I wanted to produce and work directly with .tex files, without detouring through the .lyx format. Although I primarily use LaTeX to format text, the document must be semantically correct in order to build and compile into a PDF, and a code editor seemed like a natural choice to help facilitate this process.
NeoVim is a current iteration of the storied Vim text editor, modernized to include many of the features of IntelliJ, VSCode and other IDEs, while remaining light-weight, responsive and powerful. Vim works very differently from other text editors, and this can be a good thing, but the lack of common ground with prior experience can slow down the learning process, especially at first. I recommend the article Learn Vim for the Last Time by Daniel Miessler if you are curious about why or how to use Vim. This article focuses on how to customize your Vim environment for working with LaTeX files.
Instead of a settings menu, Vim uses a configuration file, allowing maximum flexibility in customization. But if you are not used to mucking around in configuration files, getting your settings just right will take trial and error. On my system with NeoVim, the location in is ~/.config/nvim/init.vim. Learning to use the default configuration is helpful when you are working on new or random machines, but selective customization is key to an ergonomic and productive flow.
Plugin Management
The preamble of my init.vim file is the plugin invocation. Plugins extend the functionality of Vim for specific use cases. The vim-plug plugin manager is popular and works without issue on my machine (it should also work on MacOS according to this article). The most relevant plugins for my LaTeX workflow are vim-tex for compiling tex files to pdfs and displaying them in a viewer, ultisnips for snippet completion, and vim-lsp for syntax checking.
Using vim-plug requires separate installation, although you should be able to copy and paste the necessary commands for your system from the instructions on the github site into your terminal. Once installed, use the following code at the start of init.vim to invoke the plugin manager and load the specified plugins.
" plugin manager junegunn/vim-plug
call plug#begin('~/.vim/plugged')

" language server protocal
Plug 'prabirshrestha/vim-lsp'
Plug 'mattn/vim-lsp-settings' " Installation helper
Plug 'neovim/nvim-lspconfig'

" text editing
Plug 'lervag/vimtex' " compile and display LaTeX
Plug 'SirVer/ultisnips' " snippet engine
Plug 'honza/vim-snippets' " more snippets

call plug#end()
The first time starting Vim up, run :PlugInstall from command mode to download and install the plugins on your machine. Remember to run this command again if you add a new plugin to the list at a later time.
Syntax Checking
The first time opening a file in .tex format, Vim will prompt you to install the LaTeX language server using the command :LspInstallServer. This is a helper function provided by the vim-lsp-settings plugin, and requires the vim-lsp plugin to also be present. The plugin is a one-stop-shop for programming languages, and will prompt the user when a new server is available that supports a given file type (confirm [Y] for installation). Most of the features available are for programming, rather than writing per se. The tab completion features of nvim-lspconfig are of debatable value here, but it is part of my overall setup.
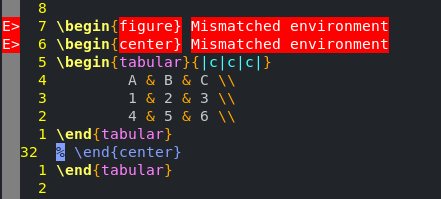
The real value for LaTeX editing is from syntax checking, which prints compilation errors to the screen in real time, allowing the user to catch common syntax errors as they occur, rather than at compilation time. In the following example, I have commented out the closing center block, and the language server helpfully informs me I have mismatching environments. This is also useful for catching missing braces, and other common formatting errors.
Compiling and Viewing
The vimtex plugin provides functions for compiling and viewing .tex files. I like to select my own font for cover letters beyond the default serif and standard fonts, but the default compiler did not support the package I used for importing fonts, fontspec. The luaLaTeX engine combined with the nvr compiler works without issue. The mupdf reader supports navigation from the home key row using the same key mappings as Vim, providing a seamless transition between the editing and viewing experience. Specify the viewer and compiler options using the following code.
" changed from defaults for use with the fontspec package
let g:vimtex_compiler_progname = 'nvr'
let g:vimtex_compiler_engine = 'luaLaTeX'
" pdf viewer of choice
let g:vimtex_view_general_viewer = 'mupdf'
The language server is a little overly aggressive with specific warnings, tracked here as an issue. I have included the fix below pasted straight from the post to my init.vim file:
" prevents spurious warnings
let g:vimtex_quickfix_ignore_filters = [
      \ 'Underfull',
      \ 'Overfull',
      \]
The vimtex plugin makes the functions :VimtexCompile and :VimtexView available as Vim commands. Typing these commands manually is not exactly ergonomic, so we map these commands to a select set of hotkeys as an added layer of convenience. In my case, I use the space bar followed by the w key start the compiler, which will build the pdf and open the viewer. The compiler stays open and updates upon changes, but I can stop and restart it by pressing <space>+w repeatedly. I like to quit the viewer when not in active use (using the q key in mupdf), and open a fresh instance when I am ready to review changes, using the space bar followed by the e key. This prevents multiple instances from accumulating in the workspace, and ensures I do not accidentally review versions that are out-of-date.
" map vimtex view for rapid pdf display
nnoremap <space>e :VimtexView <CR> 	" spacebar + e opens pdf viewer
nnoremap <space>w :VimtexCompile <CR>	" spacebar + w starts/stops compiler
LaTeX Grammar
Commands in Vim offer a powerful framework to navigate and manipulate text. A basic grasp of navigation from the home row keys, and the ability to enter insert mode are sufficient to begin using Vim as a text editor, but familiarity with the grammar of Vim commands can enable more efficient actions and increase productivity. The best introduction that I have read to Vim's grammar is Daniel Miessler's Learn Vim for the Last Time, which deserves another mention here. Whenever the task I am working on feels repetitive, I start to wonder if there isn't a Vim command I have not discovered yet that can make my life a bit easier.
Vimtex extends the types of text objects that Vim recognizes to include LaTeX commands (c), delimiters (d), environments (e) and equations ($), which the user can modify using the inside (i), around (a), and surrounding (s) adjectives, and manipulate using the delete (d), change (c) and yank (y) verbs, as shown in the following table:
| Verbs | Adjectives | Nouns | |||
|---|---|---|---|---|---|
| d | delete | i | inside | c | command |
| c | change | a | around | d | delimiter |
| y | yank | s | surrounding | e | environment |
| $ | equation |
A common use case in my workflow occurred while reformatting a chapter from my thesis for submission to a journal for publication. Citations in the thesis are organized in a .bib file, but this journal wanted citations listed in \phantomsection blocks at the end of the article. With the .bib file open on one pane, I would copy a correctly formatted citation in the article, then change the author, title and publisher for each new reference to resemble the following:
\phantomsection
\label{name} Author, Name. (Year) \textit{Title}
	\textit{Publisher} \textit{Volume} (Number), pages.
For the author field, which may contain multiple commas and periods to accommodate multiple authors, the field terminates in a date of publication wrapped in parenthesis. The command ct( ("change to open parenthesis") deletes the current field up until the publication date begins, and places the cursor in insert mode. Unless there are a significant number of contributors, I am likely to retype the names, rather than copy and paste. The number representing the year counts as a single word in Vim's grammar, so the command ciw ("change inside word") deletes the current number and places the cursor in insert mode to type a new year. If only a single number is off it can be faster to use the swap (s) key. These are examples of basic Vim commands that come in handy for me.
The title and publisher fields, however, come wrapped in braces. While Vim is sensitive to delimiters, and the command ci{ ("change inside braces") will delete the content within the braces as expected, neither it nor its cousin ci" ("change inside quotes") are very ergonomic. Here the delimiter (d) noun from vimtex comes in handy. The title field is often long and technically-worded, making manual retyping prone to error, so I prefer to copy directly from the .bib file and paste into an empty set of braces. First I remove the old title using the command did ("delete inside delimiter"), which clears the contents of the braces while leaving the cursor in command mode. From there, I can directly issue the command to paste the title into the braces (see the section on Copying and Pasting.
LaTeX Navigation
The vimtex plugin also extends navigation commands for LaTeX-specific use cases. The [[ and ]] commands move the cursor backwards or forwards by section. This can be a useful way to navigate during the review process, especially when restructuring the table of contents. The [m and ]m commands move to the prior or next LaTeX environment, while the [n and ]n commands jump between equations. Jumping environments can be helpful while referencing figures, to move between the figure caption and the text block referring to the figure. Moving between equations is also helpful during the review process, especially while trying to codify notation between sections. The following table shows a breakdown of the navigation grammar for vimtex:
| Verb | Beginning Nouns | Ending Nouns | |||
|---|---|---|---|---|---|
[ | previous | [ | section start | ] | section end |
] | next | m | environment start | M | environment end |
n | equation start | N | equation end | ||
r | frame start | R | frame end | ||
* | comment |
Using Snippets
While working on my thesis, I used the Lyx editor. I appreciated that the dropdown menus on Lyx listed an alternative hotkey for each command, and I was quickly able to transition to hotkeys for producing most of the formatting blocks for figures, tables, etc. The breaking point came for me when I updated my Lyx edition to find the hotkeys still functional, but no longer listed on the dropdown menu. With no clear pathway to re-enabling this feature in the settings, the relevant hotkeys slowly began to fade from my memory. One day I began to wonder if I could not use the same editor for LaTeX as I did for other programming languages, and found NeoVim admirably suited to the task. The problem LaTeX creates is a sea of boilerplate code related to labels, sections, figures, tables, and math equations, with the actual content sandwiched in-between these formatting blocks. Using a snippet engine enables me to produce these repetitive blocks of code by using the tab key to expand short key sequences into larger code blocks.
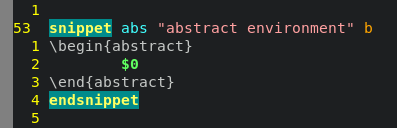
Both ultisnips and vim-snippets include snippet libraries that cover the majority of common use cases for LaTeX. The best way to learn what is available is to peruse the list of defined snippets, which for ultisnips is in /usr/share/vim/vimfiles/Ultisnips/tex.snippets, and for vim-snippets is in /usr/share/vim/vimfiles/snippets/tex.snippets on my linux machine. While editing a LaTeX document in insert mode, pressing the tab key after any of the short codes specified by the word snippet will expand to the code below up until the line endsnippet. For example, lines 53-56 of Ultisnips/tex.snippets define a snippet called abs that expands to the beginning and ending code blocks of an abstract environment. The $0 is a special variable that places the user's cursor inside of the code block upon generation, allowing you to immediately begin filling the block with content, either manually or by pasting from the clipboard.
I use the following lines to set snippet expansion to the tab key in my init.vim. For snippets with multiple user-defined fields, the <ctrl>-j combination moves the cursor forward by one field and <ctrl>-k moves it back by one.
let g:UltiSnipsExpandTrigger="<tab>"	% tab triggers expansion
let g:UltiSnipsJumpForwardTrigger="<c-j>" % move cursor foward one position
let g:UltiSnipsJumpBackwardTrigger="<c-k>" % move cursor back one position
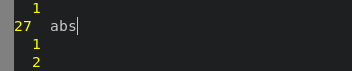
While in insert mode, I type abs followed by the tab key:
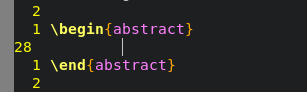
This results in the following expansion, with my cursor centered within the block ready to enter content:
The keywords enum, item and desc similarly create the opening and closing blocks for the enumerate, itemize and description environments, respectively. These lists default to having a single \item, and the keyword it expands to add an additional \item. For code blocks that include bracketed optional arguments, pressing the delete key will remove the optional parameters. For instance, the pac keyword expands to the line:

The first cursor position snaps to the inside of the brackets for the optional package argument. Here the delete key will remove the brackets as well as the text. The forward trigger (<ctrl>+j) moves the cursor to the next user-defined parameter, in this case the package name (which I have changed to fontspec), and then advances the cursor to immediately after the closing brace:

The fig keyword is one of the more useful snippets in my workflow, because it includes a sensible level of default formatting, including centering, a label, and image width capped to 80% of page width. Here I have edited the default image name to mypic.png to illustrate that the figure caption and label both mirror the selected image name, with the start of the caption capitalized. This is not a useful feature to me for captions, but I use it regularly to set label names based on image file names:

When there is user-defined text in snippet code blocks, the cursor moves through a predefined sequence of fields to receive input from the user. At this time, Vim in is insert mode, and anything you type will appear on the keyboard verbatim. For options, a sensible default appears (e.g. width=0.8\linewidth) whereas field names tend to be descriptive (e.g. \label{fig:name}. If you type something, this will overwrite the default value. Advancing the cursor either commits your changes or preserves the default as-is. Vim returns to command mode only after traversing through all the user-generated fields in the invoked snippet. If you want to amend the default in a field, you can press the tab key to keep the default and enter command mode, where you can edit it, but this does not cancel the rest of the generation process, and the forward trigger will still move the cursor to the next field in the call order if additional cursor points remain. Use the escape key if you want to abort midway through.
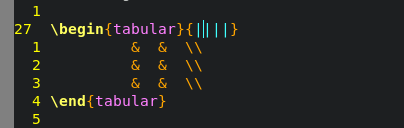
The cha, sec, sub, ssub and par keywords expand to chapter, section, subsection, sub-subsection and paragraph blocks respectively, starting with the cursor positioned inside the title braces. Variants ending in asterisks (e.g. sec*) expand to unnumbered blocks. Although the keyword tab will generate an empty tabular environment, I prefer to the use the gentbl keyword, followed by the dimensions of the table in format WIDTHxHEIGHT. For producing a table with three rows and columns, I would enter the following text in insert mode, followed by the tab key to trigger snippet expansion:

This expands to the following code, with cursor points at each blank field:
When typing freely, I tend to forget the forward slashes at the end of rows, so starting with a syntactically correct table is helpful for me. Similarly, the characters tr followed by a number will expand to a table row with the corresponding number of fields.
The keywords eq, eql and eq* expand to a numbered equation block, without and with a label, and an unnumbered equation block respectively. The frac keyword expands to \frac{}{}, with the added benefit of moving the cursor from the numerator to the denominator on forward trigger, and sum works similarly. The characters ls expand to \left{} \right{}, and for the delimiters (, |, { and [ the pattern ls* expands to \left* \right*, using the appropriate closing delimiter, and placing the cursor in the center of the block.
While the shorter fig and tab keywords expand to the block environments, using the complete words figure and table will expand to references including the appropriate leading word, so:
figure
becomes:
Figure~\ref{fig:}
Similarly, the cite keyword expands to a cite block with reference fields for a .bib file, and url expands to \url{}. Here the purpose is less to reduce keystrokes than the use of the less ergonomic \ { and } keys, and the occurrence of dangling delimiters or missing end blocks. Along this vein, the lone character b followed by the tab key expands to:
\begin{something}

\end{something}
The first insert will overwrite the word "something" in the begin and end braces, and the next will place content inside the block. These snippets cover the common use cases for my LaTeX workflow, but they are only a selection.
The only use case I have found for writing my own snippets is to generate templates for frequently-used document formats like cover letters. Typing the word memo followed by tab will expand to a cover letter with my name, the current date, and a link to an image of my signature. Compared to saving a blank letter as a .tex document, and copying and saving a new version for each letter, storing the template as a snippet is easier to use, and I do not risk overwriting my blank copy accidentally. I recommend checking out jdhao's blog if you are interested.
On my system, an interesting hiccup occurs when installing vim-snippets, where invoking a snippet triggers a duplicate resolution menu. For example, pressing tab after eq provokes the response:

The reason this occurred is that the snippet file was copied into two places on my system, once in the home directory under .vim/plugged/vim-snippets/snippets and again in the general file system in /usr/share/vimfiles/snippets. If you run into a similar issue with duplicate snippets, you can change the name of the file in your home directory to a name other than tex.snippets, which should prevent it from associating with .tex files. For instance, on my machine I use the following lines of code to the resolve the issue:
cd ~/.vim/plugged/vim-snippets/snippets
mv tex.snippets tex.snippets.bk
Configuring for LaTeX
My init.vim configuration file has the following LaTeX-specific settings:
" OPTIONAL: Starting with Vim 7, the filetype of empty .tex files defaults to
" 'plaintex' instead of 'tex', which results in vim-LaTeX not being loaded.
" The following changes the default filetype back to 'tex':
let g:tex_flavor='LaTeX'

let g:LaTeX_indent_enabled = 0 " disable auto-indenting
let g:LaTeX_fold_envs = 0 " disable line wrapping
let g:LaTeX_fold_sections = []
The section changing the tex flavor to LaTeX is copied straight from Stack Overflow, along with the explanatory comment, which may or may not be correct. I have never experimented with the consequences of not using it. Automatic indenting is a bit of a backfire in LaTeX, inserting additional indents into lists and generally being a nuisance, so I have disabled it by setting the value to zero. Likewise, I have disabled the default line wrapping for environments and sections. For collaborative documents, I like to save line wrapping for the end, to avoid tracking line breaks during the drafting process. Feel free to experiment here.
Spell Checking
Spell check is a basic functionality offered by email and cell phone messaging apps, even fields in web submission forms, and so getting it up and running in Vim is an important feature to compete as a LaTeX editor. Even for those of us good at spelling, fatigue and haste can contribute a surprising number of errors, and it helps to have the computer double-checking the work. After some investigation into why misspelled words were not highlighted in my display, I discovered that spell-check was enabled and working in Vim the whole time, I just did not understand how to use it. The following four lines of init.vim contain all the spell-check specific code:
" see https://jdhao.github.io/2019/04/29/nvim_spell_check/
" spell-check
set spell spelllang=en,cjk
" limit spelling suggestions to n
set spellsuggest=best,7
" map spell-check toggle
nnoremap <leader>y :set spell!<cr>
" highlight misspelled words in red
hi SpellBad cterm=underline guifg=Red
According to the link referenced in the top comment, including ckj will prevent Asian characters from being flagged as misspelled. Then if I quote my favorite poet, Lao Tsu, the block will not be highlighted as an error. Otherwise, I believe English en is the default language. The spellsuggest field sorts spelling suggestions according to what matches best, and I specify seven options for each error. My leader key is currently mapped to the comma key, so ,y calls the :set spell command, which turns spell-check on or off. I do not get a lot of use setting spell-check to a toggle, because in LaTeX editing I leave spell-check on all the time. Who wouldn't?
Spelling errors normally display as a wiggly underline, and this has evolved over time into a stable cross-platform convention. For my choice of color palette in the terminal, a dark mode, the colors display in GUI mode (as opposed to text mode). I could not elaborate on the distinction, except to say that the wiggly underline is not available in my specific terminal configuration, so instead I map the highlighting of spelling errors from underline to the color red using the line hi SpellBad cterm=underline guifg=Red. Until I made this change I was unable to see spelling errors highlighted, even with spell-check toggled on.
Using the s key following the [ or ] brackets moves the cursor to the previous or next spelling error. The command z= will bring up a list of suggested corrections, while zg will enter the flagged word into the dictionary, so it will no longer appear as an error. The following table summarizes commands related to spell-check:
| Command | Action |
|---|---|
[s | to previous error |
]s | to next error |
z= | show fix options |
zg | add to dictionary |
If I type the sentence:

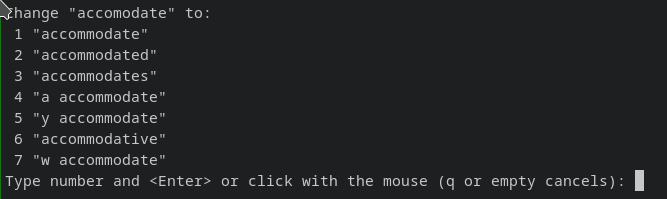
Then the misspelled word becomes highlighted in red. Pressing [s sends the cursor back to the misspelled word, and z= enters the options menu for spelling alternatives, as follows:
Clipboard Integration
Copy and paste is another basic functionality that needs to work in any credible editor. Vim offers the yank (y) and paste (p) commands, and these work as expected within a single instance of the program. The yank command (as well as delete d) copies the selected text into a buffer. The user can store text in multiple buffers, which I have not found much use, but I often want to paste the contents of this buffer to another program, and this I cannot do, even for another instance of Vim. This can also be a problem when trying to copy text into Vim from another program, like a web browser, because the text buffer in Vim does not check the contents of the desktop clipboard.
On Linux, I call the xsel command to copy or paste from the clipboard, with copying mapped to <space>+c and pasting mapped to <space>+p, using the following code:
" clipboard integration
noremap <space>p :read !xsel --clipboard --output<cr>
noremap <space>c :w !xsel -ib<cr><cr>
On MacOS, enable copy and paste from the clipboard using the following line in your init.vim (from Alan Smith):
set clipboard=unnamed
Instead of calling xsel, MacOS users will want to use the pbcopy and pbpaste commands (via Stack Overflow).
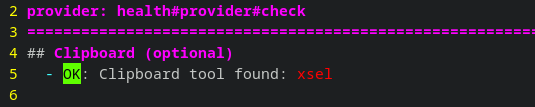
Running the command :CheckHealth will print a diagnostic for the clipboard, indicating if it is enabled. On my machine the output is as follows:
Terminal of Choice - Alacritty
NeoVim opens in the terminal, and so the terminal application you use can greatly impact the editing experience. Alacritty is currently #8 on ItsFOSS's top 14 terminal programs, and #1 at linuxhunt.com's list of top seven terminals, which notes that it has been the most trending linux terminal since its debut in 2017. A main selling point is being cross-platform - it should work without issue on MacOS and Windows. Initially, I got interested in Alacritty because it is written in Rust, the same language I use for doing research. But Alacritty is a terminal, and even the configuration file is in yaml format and not toml, so I wouldn't learn any Rust by using it. However, it integrates well with my shell, multiplexer, and editor, and has several features I have grown to like.
Configuring Alacritty
The configuration file for Alacritty on linux in ~/.config/alacritty/alacritty.yml. One of the things I like about Alacritty is that I do not have to change much to get a setup I like. Accessing the terminal history using scrollback is a key feature for me, and if it is not set by default, the following lines will create a scrollback buffer that will hold up to 10,000 lines.
scrolling:
# Maximum number of lines in the scrollback buffer.
  # Specifying '0' will disable scrolling.
  history: 10000
To adjust the window opacity, amend the following lines in alacritty.yml:
# Background opacity
#
# Window opacity as a floating point number from `0.0` to `1.0`.
# The value `0.0` is completely transparent and `1.0` is opaque.
window:
  opacity : 0.85
The default color scheme is a dark mode, and the only tweak I have made is to darken the yellow to increase legibility:
  # Normal colors
  normal:
    black:   '#1d1f21'
    red:     '#cc6666'
    green:   '#b5bd68'
    yellow:  '#ffd900' # darker, more readable mustard
      # yellow:  '#f0c674' # older lighter, sun yellow
    blue:    '#81a2be'
    magenta: '#b294bb'
    cyan:    '#8abeb7'
    white:   '#c5c8c6'
To initiate a new work session, I like to start a new terminal instance, and for my terminal multiplexer to open by default. The following lines in alacritty.yml will open Zellij on start, and set the shell to Fish:
shell:
  program: /usr/bin/zellij
  args:
    - options
    - --default-shell
    - fish
On MacOS the program path will be ~/.cargo/bin/zellij if you have installed Zellij using cargo.
Shell of Choice - Fish
I typically invoke NeoVim from the command line by typing nvim followed by a file path name. NeoVim will create an empty file at the location if none exists. The default command line shell is bash, and I still switch to bash when copying arcane scripts from Stack Overflow, because Fish references environmental variables with slightly different grammar, but overall I like the addition of tab completion and pretty colors.
Compare opening a research paper in the Fish shell, where I can either use the right arrow key to accept the suggested path completion based on my history, or press tab to open a completion menu below, as shown here:

Bash also offers tab completion, but without foreshadowing. Pressing tab once will expand the path name, and a second tab will print a path menu, which looks as follows in our example:

I know which I prefer.
Recently, I tried using nushell, following the blog post by YJDoc2. Although the shell worked in isolation on my machine, when integrating with Zellij it opened multiple terminals (flooding my system), and I was unable to diagnose the issue or mitigate the problem. Fish is #5 on the top five terminal shells from linuxhint.com, whereas fosslinux.com lauds the Zsh shell for "brilliant autocompletion", and Fish does not even make the list, so maybe I am missing out by not giving it a try.
Multiplexer of Choice - Zellij
Initially I used tmux for organizing multiple open terminals, and I enjoy the ability to sort my screens into new windows or additional panes without the use of the mouse. Zellij improves the user interface by displaying a hotkey menu at the bottom of the window, making navigation more intuitive:

The control key triggers the majority of Zellij commands, with a context-dependent menu opening on the second line based upon which mode the user selects. The pane mode manages multiple prompts within a single window, while the tab mode manages prompts in multiple windows. The alt key triggers navigation of panes and tabs using the same home row keys as Vim.
Even when I am focused on writing new content, I am likely to leave the snippet file open as a reference. When copying and pasting from another file, in my case from a bibliography file to an article, I open the reference file in a third pane. Unrelated workflow goes in additional tabs, and I can visually track the active tab using the indicator at the top of the window:

The active terminal is highlighted in green. When accessing pane, tab, resize or any of the other modes using the control key followed by the appropriate trigger, the active terminal becomes orange and the context menu changes to show available commands. Typically, pressing enter is sufficient to drop out of this command mode and go back to typing into the prompt.
The documentation details how to modify keybindings and color themes in ~/.config/zellij/config.yaml, but I have not adjusted any of the default settings. I have already set the colors in alacritty.yml, and because the user interface for Zellij is so well thought-out, I leave the key bindings as-is, and adjust my key maps in Vim so they do not conflict. I find myself wishing NeoVim offered a similarly visual menu of the available hotkey commands, but a terminal multiplexer covers a relatively narrow range of functions, and I am not sure how a visual menu could adapt to the degree of customization that key bindings receive in a typical Vim configuration file.
Key Mapping
Since NeoVim operates inside a multiplexer inside my terminal, I have to take care that the random key maps that I copy from the internet do not reuse any mappings set in Zellij. Generally, I find the control and alt keys come heavily loaded as hot keys, with some plugins adding new mappings by defaults. The space bar is my favorite command leader because it often has no use in Vim command mode, yet is ergonomic to use (being the home key of the thumb). You can specify a key of choice as mapleader, and then refer to it in mappings as the <leader> key. The space bar, control and alt are natural leaders, so I refer to them by name, but I like to set the mapleader as a catch-all for commands that do not map to a named leader. Using the key word <leader> to trigger commands allows me to experiment with alternate configurations by changing the single line where I designate the mapleader (currently set to the comma key):
" set <leader> key
let mapleader = ","

" change Ctrl+j to Esc
nnoremap <C-j> <Esc>
inoremap <C-j> <Esc>
vnoremap <C-j> <Esc>
snoremap <C-j> <Esc>
xnoremap <C-j> <Esc>
cnoremap <C-j> <C-c>
onoremap <C-j> <Esc>
lnoremap <C-j> <Esc>
tnoremap <C-j> <Esc>
My favorite key map, and the one I miss the quickest when using default Vim, is setting <ctrl>+j equivalent to hitting the escape key. I find putting the escape key on the home row ergonomic and intuitive. The character salad of remap statements refer to different modes, and help make the behaviour of the <ctrl>+j combination consistent in different settings.
Some commands, like write (:w) and quit (:q) are such common use cases that I find it helpful to map the semicolon to the colon, allowing me to enter commands without using the shift key. Since I mapped the commands to move the cursor to the beginning or end of a line to the home keys H and L respectively, I make frequent use of them.
" avoid <shift> when typing commands
nnoremap ; : " pressing ; reads as :

map H ^ " pressing H moves cursor to beginning of line
map L $ " pressing L moves cursor to end of line

" Find symbol of current document.
nnoremap <silent> <space>o  :<C-u>CocList outline<cr>
For small documents, I start at the beginning (gg) or end (G), and scroll up or down by half pages using <ctrl>+u and <ctrl>+d to arrive at the area of interest. But as a text grows in size and complexity, this method becomes increasingly inefficient. The CocList outline function, which I have mapped to <space>+o, produces a list of sections, subjections, figures, tables and equations, which the user can navigate to using the arrow keys for selection, or by searching for a text string:

My init.vim takes heavy inspiration from the configuration file of Jon Gjenset, from the Crust of Rust series. There are general quality of life improvements (not specific to LaTeX) that I have omitted, and large sections that are specific to Rust. The file has grown to several hundred lines of code, but the few lines I have shared here should be enough to set up a LaTeX workflow. Let me know if I missed your favorite plugin, or feel free to share your favorite trick. What is your LaTeX flow?